Showing posts with label Tutorial. Show all posts

Thursday, 5 November 2009

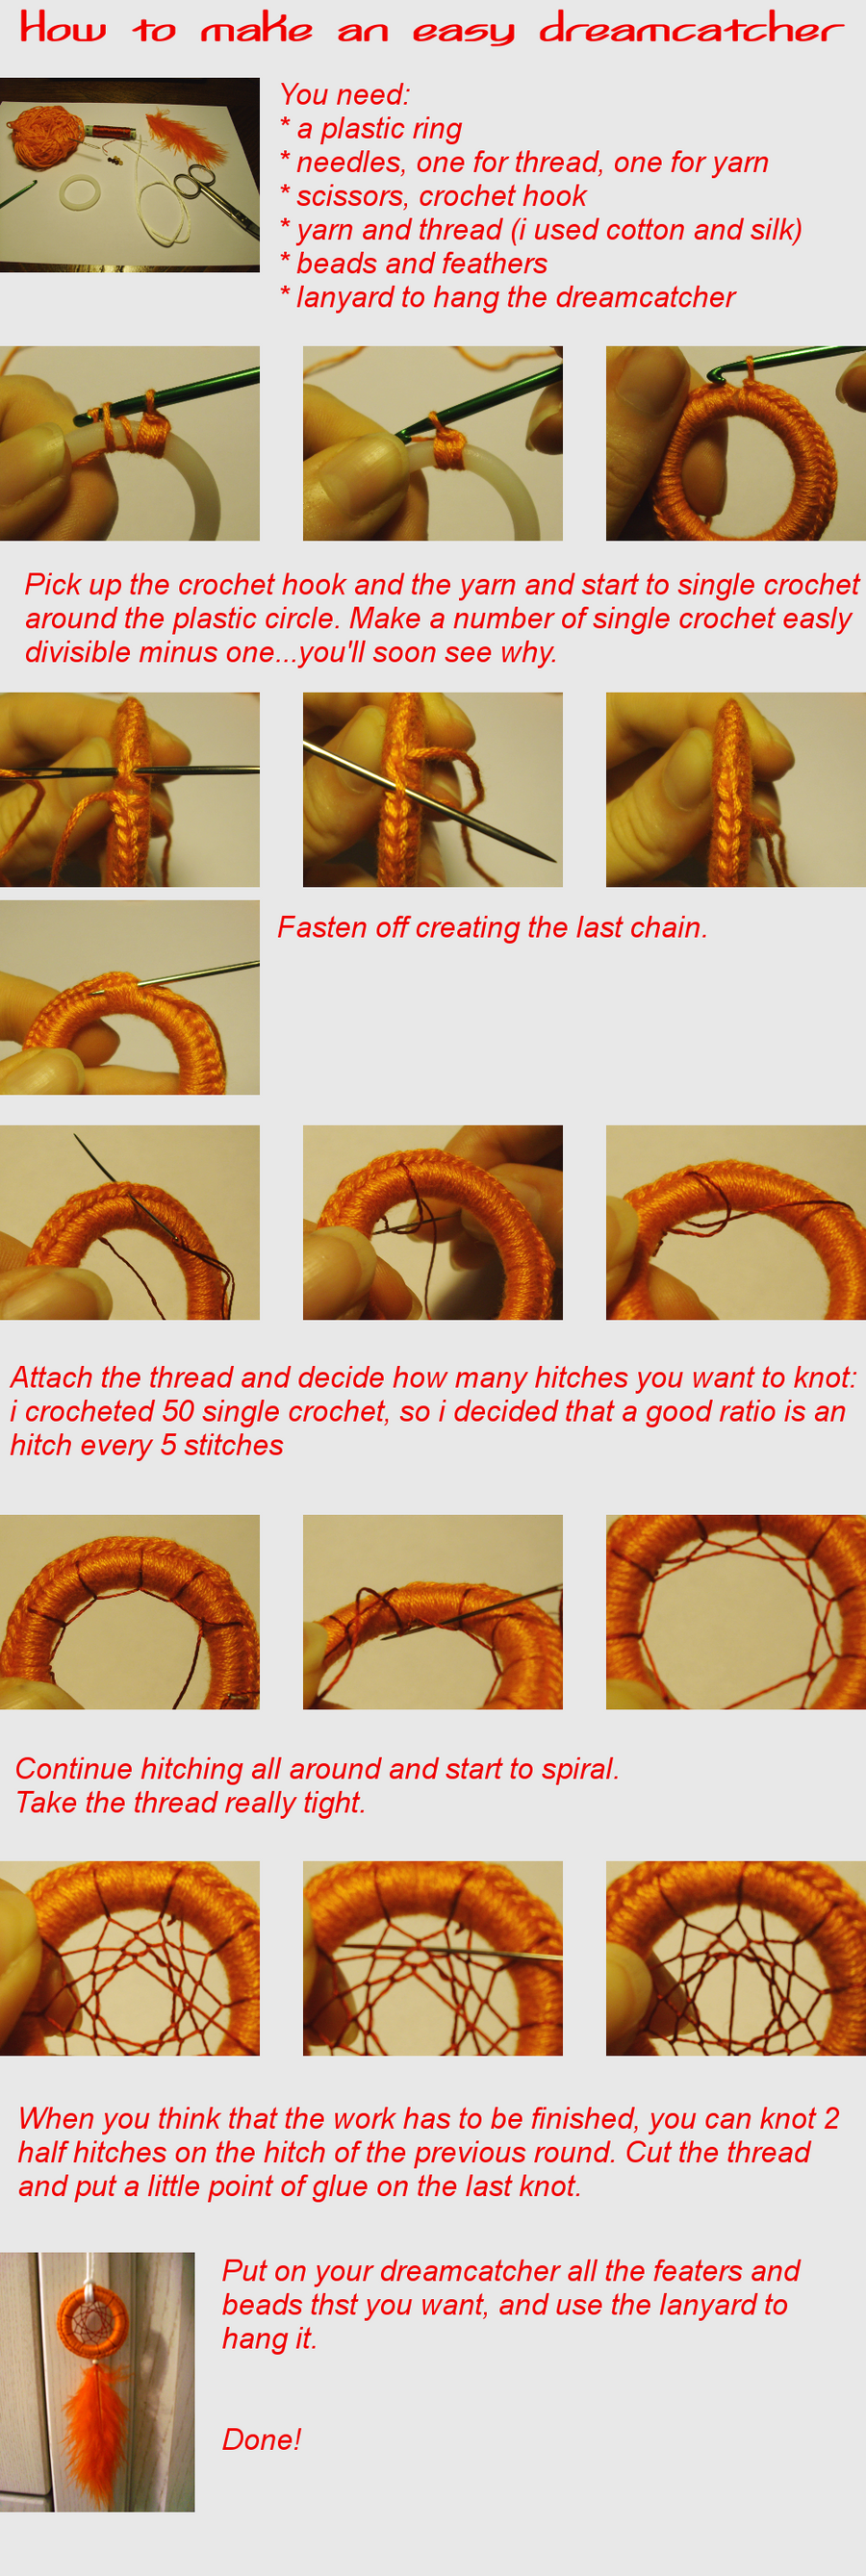
How to make a dreamcatcher

For the native americans, the dream catcher is a handmade object based on a willow hoop, on which is woven a loose net or web. The dreamcatcher is then decorated with personal and sacred items such as feathers and beads. Hung above the bed, is used as a charm to protect sleeping people from nightmares. (by Wikipedia)
Have you ever wanted to make your personal dreamcatcher, but the netting work scared you?
No problems, now you have a tutorial! ^^

Wednesday, 27 May 2009

Useful yarn display

When going out for supplies shopping, is really awful to find the perfect bead for your last project, but don't know if the color will match.
I need a useful yarn display. The properties i want are:
- easy to carry out for shopping;
- with the label of the yarn, if i need to restash.

Aaaand...this is my solution!

I punched the holes directly on the yarn's label, cut some pieces (it will be perfect to have some scraps!) and knotted on the labels. The last step is to staple the labels on a recycled paper page, fold and...voilà! Easy to carry!

Tweet this post!

Thursday, 7 May 2009

Finally a light box!

It's been for 3 months that i'm looking to make my personal light box and improve my photograph skills. Well, the skills are slowly improving, the light box is finally made.
Today, after a relaxing shower, i decided to continue my relax in front of my pc, then i saw the cardboard box of my chocolate Easter egg...mmmm...
After 15 minutes i had between my creative hands the finished light box! I also found the way to recycle a bakery sheet that i used in my experiment of fusing plastic bags (that went not well).
Here is the how to ^^
Materials:

* the box of my Easter chocolate egg that otherwise my grandma would have thrown away;
* baking paper, that i used to fuse some plastic bags, and would have been a waste to throw away, but i could not use to cook something;
* scrap yarn;
* glue, not recycled, obviously;
* cutter.

You can also find this project on Cut out + keep and on Instructables :)

Tuesday, 21 April 2009

Instructable!

Today i joined Instructables, and i added a simple project to try it out.
The project is about the double chain, a fantastic way to start a crocheted item in rows, so you don't have to catch up with the chain, or frog all to crochet a larger chain. I found the instructions on an old mama's crochet book, and it changed my life ;)

Go to the instructable

I also wrote the tutorial on Cut out + keep, and for deviantART...here it is!

Thursday, 16 April 2009

About photos...step #2

In this step we will edit our photos to reach a quality image. I use Gimp, that's a free program very powerful!

A lot of people think that the photo editing is unfair, but i think that, if used in the right manner, it can make the difference: the photo is the key for success and a photo, to be successfull, mustn't have to appear edited.
If we put a lot of love in our handmade items, i don't see where is the problem in making it stand out with good pictures, edited with love :)

Open the program and the photo. The first thing to do is to crop the image. Think about that the image that you want to be the preview (and then smaller than the full size image) has to be interesting: in this image we will show only a part of the item, the more interesting, eye catching and particular.

Then, open Colors >> Levels. You'll se an istogram that indicate if your photo is over or under exposed. Place the arrows under the istogram near the start and the end of the graph...the result is wonderful! Do thi step only one time, or the photo will be worse than the initial shot, and take all the time you need to place these little arrows and reach the best result.

If you want your item to stand out, try to adjust the saturation, and make a darker border all around the photo: this trick is used by professional photographer to grab the viewer eyes, and it makes the photo more deep, giving strenght to the center ;) be careful to not saturate too much: we want to achieve the true color of the item!!

Try also to duplicate the background layer, add the alpha channel and play with the modality of the level, playing also with the opacity. Take all the time you need...the best solution is to take confidence with the effects before you start to photograph your items, so you'll already know how to modify the photos.

Wednesday, 8 April 2009

About Photos...step #1

The photo is the MOST important thing of a listing. You can write beautiful stories about the creation of your goods, but a ugly photo will shatter all your words. Wear the buyer clothes: what's the first thing you see of a listing? The photo. Simple. If you want your buyer to fall in love at first sight with your items, you must have beautiful photo. The good news is that you can achieve all with basic instrumentation :) In this tutorial i will consider that you have familiarity with your camera and with Gimp.

In this first step we'll talk about taking the photo.

* Ensure to have enough power, we will take a lot of pictures to have enough choice;

* Place & light: try to take photos with the natural and non direct light, absolutely no flash. Near a window will be the best solution. Place your item on a white backround (or contrasting if the item is white) to take the particulars, and then place it in its natural setting for an overall photo. Be creative and show how the buyer can use your item. I love the white background, it gives a very professional effect to the photo ( it also allows you to check the white balance ) but you can use coloured or textured backgrounds, depending on the color of the object: the only limit is that we want to focus the attention on the product, not on the background ;) use this link to make a light box;

* White balance: the white in your photo has to be white, or all the colors of your precious good will appear different. It is very important when you are using a non natural light. You can find the white balance in your camera menu;

* Over/under exposure: also useful when you are using a non natural light pointed directly on the item (that's always bad...try to use non direct light). The photo will result too bright. The opposite when you have less light than you need. Under expose in the first case, over in the last (you'll need a tripod to have a sharp image);

* Macro: truly important to have sharp images when taking photo near the object.

And now, we are ready to shot! The only advice i can give you is to center the item, because the camere will focus on the center of the image. And then...be creative!

Tips i learned during an Etsy Lab: don't photograph your item on felt or wool, because it's easy to reach a blurry effect, and don't add watermarks, because they don't feature on the front page photos with watermarks!

Soon step #2 about editing :)

Saturday, 4 April 2009

Digital design for crafters

I don't remember when i turned to Linux Ubuntu, but i remember the panic when i discovered the graphic program installed: Gimp. What are those damn levels? Why the selection just doesn't anchor on this damn image? And why the rubber makes all these terrible gray squares???

These were only some questions i asked to my dumb pc, and never had the chance to find answers (and the online guide scared me like the program itself). So, i used to use Gimp only for little projects, orrible avatar&banners that i pretend to be beautiful and charming, and stop. I don't even remember when i decided to search "gimp tutorial" on deviantART... :O the world changed! I learned how to use Gimp! Starting from the basics (levels, effects, brushes), i learned how to make something more charming than my first banner. I want to give some advices to other crafters like me.

First, save the image in the .xcf format, it will mantain all the levels of the image. Then, when you'll finish your work, save in .png: this format will mantain the trasparency of the levels, and will avoid orrible blurry effects on letters.

Create a level for everything you add on the image, so you can edit one thing without touching the others, you can apply effects only on one level, adjust the color balance, or just avoid to see it if you want to make another try. The great thing about levels is that you can move them up and down ;) Play a lot with the opacity of levels: i somethimes duplicate levels, add some effects and then decrease the opacity, to have soft shades of each effect.

The selection tool is your friend: you can stroke the selection, round its corners, select only one area, invert it, move it. You can make an automatic selection from the letters you wrote, or from a certain color of the image to modify it. The possibility are unlimited.

Alpha channel is our best friend: all the work on the levels is about their transparency, and the alpha channel is just this, transparency. The firts level you have when you create a new image is not transparent, but just right-click and "Add alpha channel", and you're done!

Brushes...i love brushes! On deviantART lots of big-hearts offer for free their beautiful brushes! Give them a try, all my badges&banners have now a flower or swirl brush on ;)

I think a newbe won't comprehend what i'm saying (i'm sorry, on deviantART there are lots of free tutorials, just start from there, i have an italian gimp, will be problematic to show all the designing process ^^), but this is what i found to be interesting for who like me likes to design their own brand, and manage it from the blank image to the printed shining business card ^^

Some other advices from not-so-newbe like me?

Wednesday, 25 March 2009

...but this can be posted!

Amigurumi tip about belt
In a secret tray of my library was stashed this little tutorial...i love to add belts to my crocheted guys, it separes the chest from the legs so i can use two different colors without having the line of transition between the two colors.

Thursday, 26 February 2009

How much work!

Wow, i'm again in the match: Etsy, DaWanda and Ravelry shop, this blog, Twitter, and now also a MySpace.... XD i'm going crazy XD
I have updated all my patterns, written more complete descriptions, read a lot of new blogs, learned two new amigurumi tecniques and how to use Gimp. I repeat...WOW! Ah, and i wrote 3 new patterns...all in one week...
...
WOW!

And now, who wants to study? XD I love too much all this activity: i'm learning a lot of things, my work is well received and i'm improving my english and my creative skills. WHY i have to study for a junior degree that, in the better possibility, will allow me to work in an awful office and to talk about things that doesn't touch me. :( I'm scared. I don't know what to do with my life. So, for now, i write patterns and study turbines, dreaming of a future i won't have the courage to grab.
I'm crafting like there will be no tomorrow :)

So, lets talk about the new pattern i wrote:

Net gloves with a shell motif on the back and ruffles on the wrist...so vintage! You can find the pattern in my three shops (the links are on the top, under the banner ;) )

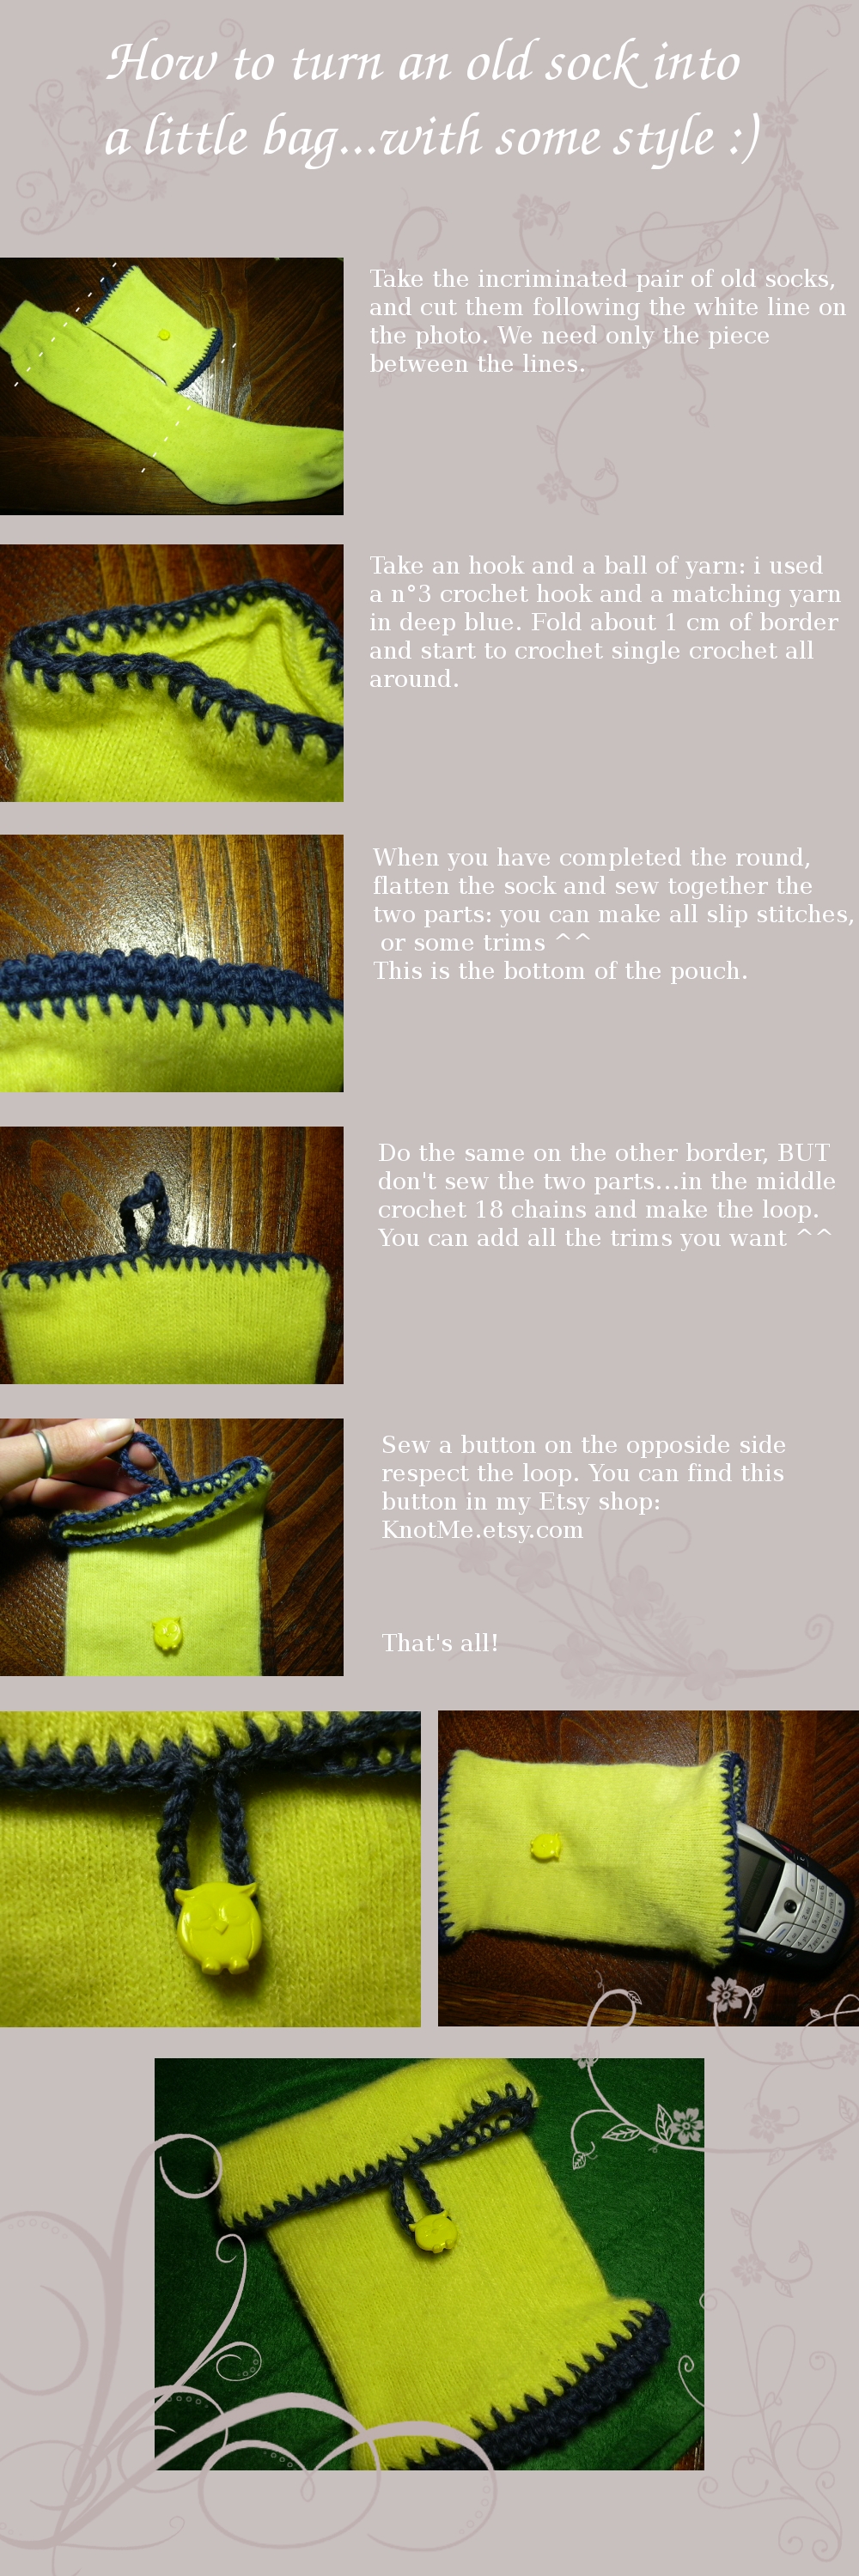
I also wrote a tutorial...

I had an old pair of socks, but a part of these was good, and i needed a sock for my cell...tadaaa!

Thursday, 27 November 2008

Snood-ification!

I AM HAPPY!
My hair become truly long, and i didn't know how to manage them untill i crocheted my personal snood:

All is neat, clean and never in the wrong place! I can crochet without crocheting my hair in the work, i can eat, wash my teeth, read, study...without have my hair between me and my target!
...and it is truly medieval, and i love it for this reason! ^^

But i suffer of headache, so i didn't crochet an elastic in the border, i preferred to crochet a border of double crochet and weave a ribbon...and i didn't find wearing instructions! :O
After a day of tries, i wrote MINE wearing instructions!

Monday, 15 September 2008

Kumihimo bracelet and tutorial

My marudai has always some threads working on it ^^
While i was braiding this bracelet

i made a lot of photos to let you know how much work there is behind this little piece of braid:


I'm very proud of my bracelets ^^

Wednesday, 2 July 2008

Back from university's hell!

Hi folks!

For this summer i finished the university exams...what a beautiful sensation! Now i can concentrate on my hobbies!

First news: i changed the style of the banner and the avatar: i made the braid with kumihimo, i knotted the braid in a Josephine knot and here they are the new avatar and banner ^^
This is the braid i used:

It's a 16 tama braid, i used cotton and some silk.

Then, another bracelet: this is for me, to celebrate the end of the exams ^^


Last but not least: i wrote a tutorial!
This is the knot:


It's a convertible knot flower/butterfly, in the photo it has the flower shape. You can find the item in the photo in my DaWanda shop.

The tutorial is here: part 1 and part 2